Serial Communication

Connecting Computers and Microcontrollers

All regular computers, some videodisc players, and many other devices have serial ports. The Serial ports on your computer are generally used for modems or printers. Your microcontroller can also communicate using these serial communication.
Contents of this page:
  1. Pin Outs
  2. Making a Cable
  3. RS232, RS Bla Bla Bla
  4. Midi Communication
  5. Settings
  6. Testing with a Terminal Program
  7. Serial Buffers
  8. ASCII Code
  9. Learning the Language of Your Serial Device
MAIN PHYSICAL COMPUTING PAGE
Getting the Pin Outs
There are three pins that are necessary for serial communication, transmit, recieve, and ground. In order to make two devices talk to each other with serial communication, you must make sure that the transmit pin (TX) on one port is talking to the recieve pin (RX) on the other port and visa versa.

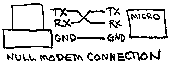
(Note a straight through cable would have had the TX touching TX and RX touching RX)

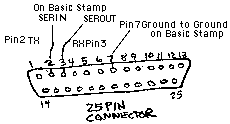
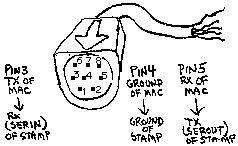
You can do this by learning the "pin outs" of the serial ports, in other words which pin is assigned to trasmitting and which pin is assigned to ground etc... With the Basic Stamp, the pin outs are assigned in software so that is easy. Below are two common serial port "pin outs".

Table of Contents

Making the Cable
Rather than make your own cable from scratch, it is sometimes easier to buy a modem cable that will fit into your computer, chop off the other end (the end that normally goes into the modem) and connect those loose wires to the Microcontroller. The hard part is knowing which loose wire on the end that you have cut coorosponds to which pin. Use a multimeter with one lead on a pin and test for "continuity" or for low resistance to the loose end of the wire.

This can get confusing so as you test each pin write down which color of loose wire coorsponds to which pin.

Table of Contents

RS Bla Bla Bla
RS232, RS432 etc... These are all serial protocols that describe among other things the type of voltage that is being used to make the signal. Most Serial Ports on computers use more than the 5 Volts that Microcontrollers use so you should put a 22K resistor before the input pin on the microcontroller to protect it. I have never met a port on a PC or Mac that could not converse nicely with 5 Volts. There are chips like MAX232 to get the levels right or you can use the programming port of the stamp which is a proper RS232 port.

Table of Contents

MIDI Communications
Using MIDI Communications has a lot of advantages. Midi communications are naturally networked and there is lots of gear out there ready to listen to it. Especially if you are already using some MIDI software, you would want your microcontroller to just fit in. Unfortunatley MIDI uses differences in current, not voltage and it is optoisolated which means you are going to need a little extra circuitry. Mark Coniglio provided me with a schematic of the circuit that you would need. Some midi synths have a regular rs232 port so you wouldn't need this circuit.
MIDI also runs at a specific speed so you have to be able to finely adjust the baud rate to around 32500. On the Basic Stamp 2 you would use the number 12 , for example serout pinX, 12, [144,60,60] for to strike middle C middle hard. (If you are going into an rs232 port on a midi synth, you would have to invert the signal so you would have to do something else to the number 12). On the Mac or PC side you can use some software like max that speaks midi or extend a program like Director to do it with "hypermidi" (doesn't work with OMS) or even just the serial Xtra.

Table of Contents

Settings
The main setting that you care about is the speed of communication know as baud rate. On the Basic Stamp you decide the settings in your program when you call the SEROUT or SERIN command. On other devices you set them with dip switches or with an initialization character. You should 1) decide on settings (for example the standard 9600 baud, 1 stop bit, 8 data bits, no parity), 2) learn how to set them and 3) make sure that both ends of the communication are using the same ones.

Table of Contents

Testing with a terminal program
In debuging your program on your Microprocessor, you should always first try sending and recieving information on your regular computer using a generic terminal program. This softare should come free with your modem or you can down load "ZTerm" here. Set the program to use the port into which you have plugged your stamp. Change the settings to 9600 Baud (2400 for the Stamp I). Anything you type will go to the stamp and anything the stamp output should appear on your screen. If you are sending decimals below 32, they will not appear in the terminal program because they are the ASCII control characters. It is very important that you do not move on from this debugging step until you are sure all the physical connections and serial programming on the stamp work. Once you are satsified then you can try talking directly to your authoring software on your computer or to a videodisc or other serial device.

Table of Contents

Serial Buffers
The computer on your desk has a serial buffer. This is like a resovoir of stuff that has come in the serial port but that your software hasn't had a chance to look at yet. If there was no serial buffer, you miss the stuff that came in while your software was busy for instance reacting to your mouse clicks. It is sort of like a separate processor that just pays attention to the serial port. Once you look at something in the buffer, it goes away. If you don't look often enough, it will over flow. All PC's have serial buffers but your microcontroller probably will not, so your program will have to stop to wait for someting to come in the serial pin.

Table of Contents

ASCII Code
The stuff being sent between the computers is always a series of 8 yes or nos, 1's or 0's. How those series of of 1's and 0's is interpreted by either end is really a matter of convention. There are two ways that you will want to interpret these signals, as numbers or as letters. The binary encoding system is how a collection of 1's and 0's are turned into bigger numbers.
ASCII is a convention whereby a given letter corrosponds with a given number. Capital "A" is for instance associated with the number 65. It is often useful to get an ASCII chart. They are usually found in the appendix of software reference books. You will see that the first 30 character are "control" characters. For example ASCII 13 is the carriage return character (worth memorizing). These control character don't really have an appearance. ASCII interpretations are the most common for most software for instance your terminal software. In the software on the PC you are sometimes giving a a choice of how to interpret what is coming in (eg. with Director's xobject "mreadchar" for a number and "mreadString" for a letter).
It usually more efficient to use numbers. For instance if you sent the number 150 in ASCII you would have to send three bytes "1", "5","0". Instead it would be better to send the one byte and interpret it as a decimal in Director. At 9600 baud you can figure it takes a millisecond to send a byte. After a while thoses milliseconds add up. It would also be very worth your while learning how binary numbers work as they will enable you to encode lots of info for digital input and output on a single byte.

Table of Contents

Learning the Language of Your Serial Device
Because you will write the program for your computer and a program for the microcontroller you will control the content, the actual messages sent back and forth. If however you are using a videodisc player, or a modem, or any other such serial device, you will have to look in the instructions for the commands and the syntax that these devices will expect. For instance to search to frame 3505 on a laserdisc using a Pioneer player, you send "3505 SE" and then a return character (ACSII char 13). In sending ASCII text back and forth, table of the ASCII characters and their coorsponding number is a handy thing.

Table of Contents
If you have suggestions or corrections please contact: osullvnd@acfcluster.nyu.edu