CIRCUITS

CIRCUITS

You don't have to know a lot about why your circiut works to get started. Instead you can learn to make a rote translation from the electronic diagram called a "schematic" to the actual attaching of wires. You don't have to know much because we only need to make enough of a circuit to transduce the energy into digital form and then do all the rest in software.

Contents of this page:
  1. Short Circuits
  2. Translating Schematic Symbols
  3. Volts, Amps, Ohms, Watts
  4. Circuit Board
  5. Wire
  6. Soldering
  7. Using the MultiMeter
  8. Parts List for 5 Simple Circuits
  9. Tools
  10. Connections to the Basic Stamp
  11. Five Simple Circuits
MAIN PHYSICAL COMPUTING PAGE
Finding the circuit diagram
You first have to track down a schematic or diagram of a circuit that will fit your needs. You can get pretty far with the five simple circuits for use with the Basic Stamp Microcontroller which are provided below on this page. If you are using some sensor or device not in these circuits, you can usually find the appropriate circuit in the application notes or instructions for that device.
You may have see more complicated circuits in books. Usually these circuits are built for some specific task or logic. These pages will not help you with this approach. If you want to learn a little more about why these things work or about designing more complicated circuits, there is a very basic book for beginners at Radio Shack called "Getting Started in Electronics" (RS# 276-5003A) or the Radio Shack Engineer's Mini Notebook series or the much more expensive "Art of Electronics" by Horowitz and Hill.

Short Circuit
The one circuit that you definately do not want to make is a short circuit. This is when the positive side of the power flows unimpeded directly to the negative side. Putting a paper clip between the two holes in a wall socket is a good example of a short circuit. With no work load to slow them down, the electrons go so fast that they will burn things down (unless you have a fuse box). If chocolate ice cream were free, I would probably die of it. SHORT CIRCUITS ARE VERY BAD. Please avoid touching the leads of of your power source directly to each other. Don't work on a conductive surfaces like a metal table because some the connections on the bottom of your circuits may touch. Trim all your wires so that the only parts exposed to the world have insulation on them.

Translating Schematic Symbols
Although you don't have to know how to write a circuit, you do know how to read one. After you have a schematic to work with, you have to learn the meaning of the symbols in these schematics and get an idea of the look of the actual components they represent. Keep the package that your compenents come in because you may need it to decypher which lead is which.
Positive +5. All electronics is about exploiting the fact that electrons want to go from positive to ground. We put our work in between positive and ground the electrons are so keen to get there they will do our bidding in route to ground. To take advantage of this we need a supply of electrons. Voltage and amperage of are terms for describing the pressure and the volume of the flow. Because we are mostly in the electronic world (as opposed to electrical) we use teeny weeny power that is enough to signal but not move things. So as to be able to communicate with other devices, we will abide by the standard that +5Volts is a yes (true, high, one, positive) and 0 Volts is a no (false, low, zero, negative). This one of the most popular destinations in your curcuits so we usually reserve a big long line of holes on your breadboard for it.

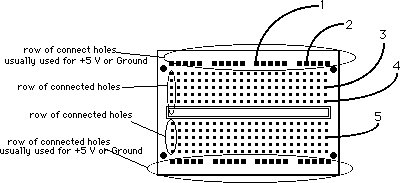
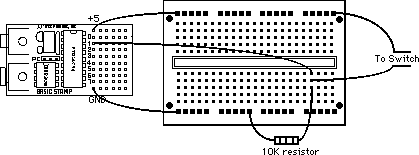
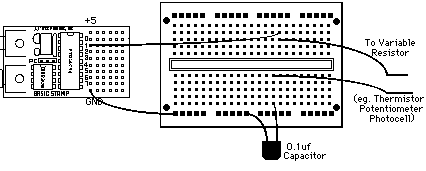
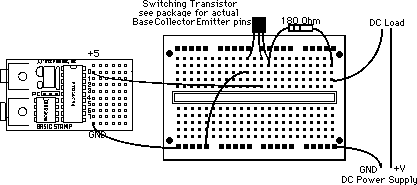
Ground. This is the simbol for the negative side of the power. It is the ambition of all good electrons to flow to ground. Ground one of the most popular destinations in your curcuits so we usually reserve a big long line of holes on your breadboard for it. An electron only recognizes its own ground so in circuits with two power sources, you may have to connect the negative sides of different DC power sources to the same common ground.


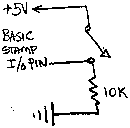
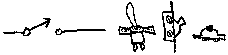
Switches. Switches allow or interrupt the flow of current. Switches usually have two interchangable leads. In addition to the explicit switches that you buy in the switch section of Radio Shack or your hardware store, you may be interested in switches that your audience is not fully conscious of. The burgalar alarm section is a good place to find these. You can also grow your own switches. Inside a switch are just two peices of metal that either touch or don't touch. Because the electricity that are going through our circuits won't hurt you (unlike the electricity that is going through wall switches) you can invent ways for two peices of metal to touch or not depending on what a person does.


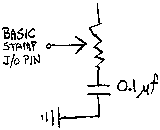
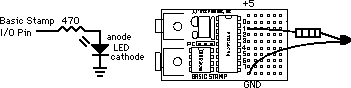
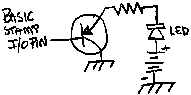
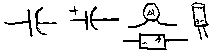
Resistors. Resistors give electricity something to do. Electicity without something to do is a short circuit and a bad thing so you will have to at least some resistance in every circuit. Resisitors usually have two leads with no polarity (no positive and negative side) so the leads are interchangable. You can identify different resistors by; 1) the package; 2) decoding the stripes from a chart; 3) check it with a multimeter. Resistors are also rated in Watts but even the tiny ones (1/4 watt) resistor are fine for these circuits.


Table of Contents

Capacitors. Capacitors store up electricity. They have two leads. Sometimes it doesn't matter which side you connect. If you are using a polorized capacitor, a + or - sign should be printed on the outside of the capacitor itself. Match the + side up with the + side in the schematic.


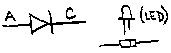
Diodes. A diode is like a one way street that only allows electricity to flow in one direction. LED's emitt like in the process. They have two leads, a Cathode and an Anode. You may have to consult the packaging or the outside of the diode itself to tell one lead from another. The longer leg being positive is one common convention for distinguishing the two leads.


Table of Contents

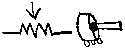
Variable Resistors. Variable Resistors discourage the flow of electricity to varying degrees. They have two or three leads. When they have two leads you can connect them any which way. With three leads use the middle lead and then one of the other two that works best.


Connected Wires. When there is a dot at the joint in the diagram, then the two wires should touch each other.


Unconnected Wires. When two lines skip over each other, the wires they represent should not touch. They cross only for convenience in making the diagram.


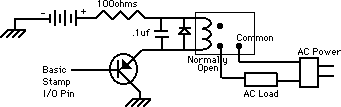
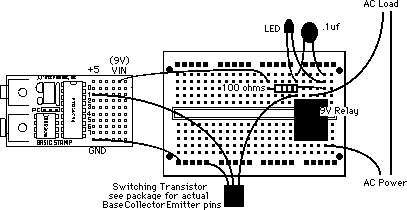
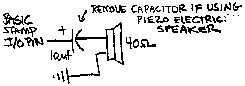
Transistors. Transistors are like switches that are switch by a electricity instead of by your finger. Transistors usually have 3 leads, a Base, a Collector and an Emitter. When the base gets electricity, it connects the Collector with the Emitter (for an NPN transistor). You can't use a transistor for switching something which uses AC power (use a relay instead). Keep the packaging for your transistors because it may have a key for telling which leg is the Base, Collector and Emitter.


Table of Contents

Volts, Amps, Ohms, Watts

You will run across all these units for describing electricity. I look at it like a bus driving off a cliff. The height of the cliff is the Volts. This is easy to remember because things at the top of the cliff (like all good electrons) will move towards the "GROUND." How many people are on the bus is the current measured in amps. The Ohms is like the wind resistance or shrubbery on the side of the cliff. Watts are the power of the impact at the bottom of the cliff. Volts is often a given for example 120V from a AC wall socket or +5 volts DC from a microcontroller.

If you have a switch or a relay, they are only rated as being safe for a certain amount of amperage. To figure out how many amps in your circuit, you can use the formula Watts (size of disaster) = (Volts (how high the cliff) multiplied by Amps (how many people on the bus) so for example a 120 Watt light bulb using 120 Volts uses 1 amp.

Ohm's law describes the relationship between resitance, current and voltage. This would be useful if we were designing curcuits (knowing that your microcontroller might be putting out 5V at 20 milliamps you could calculate the resistance needed) but we are not designing circuits so I won't go on.

Because I have a naive way of thinking about these things I am encouraged by the fact that electricity actually flows in the opposite direction of all the diagrams that engineers use. Apparently Ben Frankliin figured that electrical particles probably flowed from positive to negative (from the top of the cliff to the bottom). By the time scientist could see that in fact electrons flowed to the positive, I guess they figured it didn't matter so much so they kept all the diagrams the same. This is what I am told. If many engineers choose to view it as the more intuitive positive to negative flow, it should give you liscence to adopt whatever model you like for all this stuff as long as it works).

Circuit Board

An experimentor board allows you to make and change circuits easily. You can stick wires into and out of the holes (a needlenose pliars helps) without soldering. After you perfect your circuit on the is easy to change prototyping board, you can solder all your connections in a very similar looking board. For convience, all the holes in a continuous line are connected to each other. For instance wires 1 and 2 would be connected as are wires 3 and 4. The order in which wires are placed within a given row does not matter, each row can be treated as a single hole. This allows you make a junction in a circuit where many leads are suposed to touch each other without having to twist a lot of wires together or jam them into a single hole. Because the middle ridge breaks up the line, 5 and 4 are not connected. Almost all your circuits have many wires connected to ground or +5V so the two long lines on the side are usually reserved for these. Different experimenter boards connect differently, so you might test for continuity between holes using your multimeter

Table of Contents

Wire

It is best to use 22 AWG solid wire with the experimentor board because it is stiff enough to be easily fed into the holes on the board. This wire is not so good when you need to run multiple wires (say you have ten switches to wire up) or for long distances because it gets messy. For these and others purposes you may want to use a more flexable stranded wire like ribbon cable or telephone wire which cannot be forced into the experimenter's board very easily. To solve this problem you can; 1) solder solid wire to the ends of the soft stranded wire; 2) solder wire wrap ends sold at radio shack to the ends of the stranded wires or 3) (Best) solder "headers" not sold at radio shack but you can get from any electronics catalogue to the ends of the stranded wires. A couple of alligator clips or test leads (Radio Shack# 278-016A) can come in mighty handy when your wiring is at an experimental stage.

Soldering If you have to solder you should; 1) be careful and get a friend to help you; 2) allow the iron to fully heat up; 3) heat the items you are soldering not the solder directly, allowing the heat to transfer from the iron to the wire and then from the wire to the solder; and 4) be sparing with the solder 5) Unplug the soldering iron.

Table of Contents

Using a MultiMeter
Like most things, your circuits will not work the first time. It is easier and safer to check at each small step whether the things that are supposed to be connected are indeed connected and the things that are supposed to get voltage are getting voltage and the correct voltage. A Multimeter will be your main debugging device when things do not work. It is analogous to the message box in some software authoring programs. Of the many functions on your meter, the two that you will be most intersted in are the Volts DC (0-10 scale) (not AC Volts which sometimes has a tilde for an icon) and the Resitance ¸ (or the more convienient continuity which sometimes has a musical note for an icon).

Using the Volts you can check to see that +5 volts is passing at the expected points of the circuit by touching the black (-) lead of the meter to ground on your circuit and the red (+) lead to the points that you want to check. Your multimeter should read "5V" if you have digital readout or the needle should go half way (if you are using the 0-10 scale). If you get a negative reading, you have the +5 and Ground reversed.

Checking for continuity is even more useful. Continuity means that there is a good connection. If your multimeter doesn't have a thing called "continuity," you check for 0 resistance. First set the multimeter to one of resistance (ohms) scales. Continuity is more convenient because because it beeps and you don't have to look back at the multimeter's display. When you touch the probes of the meter together, the it should react by beeping (if you have a continuity setting) or showing 0 resistance. Now you can stick those probes at different points in the circuit that you expect to have good connections and see if they are in fact good. Don't leave your meter in the resistance mode because it uses up the battery.

Table of Contents

Parts List for 5 Simple Circuits
You should save the packaging that your components come in because it often has information about which wire is which. The numbers following an item are Radio Shack product numbers. In general you can subsitute but especially when "eg." or example preceeds the product number. The list is roughly in order of importance.
  1. Basic Stamp from Parallax, Inc.
  2. Prototype Board 276-1169
  3. AC to DC converter. The output should be between 5 and 15 volts, up to 1 amp (1000 milliamps). 9V Transistor Battery Replacer 273-1552A is nice because it has an easy to use connector on the end.
  4. 10k Resistors (2packs 4 total) 271-034
  5. 1k Resistors 271-1321
  6. .1uf eg. 272-1053
  7. LED (Light Emitting Diode) eg. 276-026 or 276-063
  8. Variable Resistor Potentiometer 271-1715 or Thermistor 271-110 or PhotoCell
  9. A switch eg. Roller 275-016, Magnetic Burglar 49-505, Mercury tilt switch275-040
  10. Sacraficial Modem Cable. Any cable with one end that fits in your serial port. It is sacraficial because you are going to cut it open and only use one end. (Staples has the cheapest)
  11. 22k Resistors 71-038
  12. Experimenter's Box eg 270-216 or 270- 293 or 270-274
  13. Metal Standoffs 276 -195
  14. DB9 Female Connector and cover
  15. 10uf 272-1025
  16. Piezo Transduceer 273-073

Table of Contents

Tools
  1. Multimeter 22-212 is the cheapest
  2. Soldering Iron
  3. Rosin Core Solder
  4. 22 AWG solid hook up wire
  5. Small phillips head screw driver
  6. Wire Strippers
  7. Diagonal Cutters 641813
  8. NeedleNose Pliars 641812
  9. PC to Basic Stamp Cable
  10. Drill and Drill Bits
  11. Nibbling Tool 64-823
  12. (10 Piece Soldering Tool Set Comes has most of these tools 64-2801)
  13. A small table vise.

Table of Contents

Connections to the Basic Stamp
In general you will have to make connections for 1)power, 2) i/o, and 3) programming. The exact shape of the connector for your make and model of microcontoller may differ. I prefer the Basic Stamp 2 which is just a chip with a 16 useful legs. You can place the chip in a prototyping board and connect circuits and sensors to the pins by sticking wires in the holes adjacent to the pins of the stamp. You can tell which end of a chip is the top because there is a little rounded knotch there. Check with the basic stamp manual for a diagram of which pin does which job.

The stamp has power in and power out connections. This is because there is a power regulator on the stamp which turns power coming from the battery or power supply which can be anywhere between 5-15 Volts into a solid 5 volts coming out of the fourth pin down on the right side. The 3rd pin down is pretty useless. 5 Volts in the magical voltage of these type of "TTL" circuits so you will use this output a lot. The second pin down on the right side serves as the negative side or ground for both 5-15 volts and the 5 volts. Usually the red wire from the battery is positive and the black is negative but check that with your voltmeter. Hook the positive wire to the pin labeled "PWR" first pin on the right side and the negative wire to pin "GND" (number 2 pin). After you apply this power, test with the multimeter to see if 5V is coming out by touching the "GND" pin and the "+5V" (pin 4). The multimeter should show that 5 Volts are present. This is a test which you should do anytime the stamp doesn't seem to work. Unfortunately the power regulator on the Basic Stamp II is really crappy so you may blow it up. IF YOUR STAMP SEEMS DEAD, you may be able to recesitate it by buying a +5 Volt regulator from Radio Shack and feeding it into the +5 power out.

Depending on which microcontroller you choose, you may get 8 or 16 or 28 data I/O pins. These are the pins that do all the work. They are a little wierd because they are numbered from 0-16. This means that the sixtenth pin is pin15. Any pin can be used for any function. The function of a given i/o pin is decided by you in software. These are the pins you will be attaching wires to in the circuits below so it is good to leave a lot of prototyping board real estate near them.

The stamp also has a port for getting its program from your computer. The stamp 2 uses a serial port(COM1 or COM2) on the PC (this means that if you have "Soft PC" software, you can program the stamp 2 from a Macintosh but it is a hassle). There are four pins for this purpose "TX", "RX", "ATTN", "GND". (On the Basic Stamp II these wires also form a good RS232 serial port but using it gets a little wierd when you are also using the port for debugging.) Parrallax sells cables for programming the stamp but if you don't buy their carrier board, you will have to make your own..


Five Simple Circuits
These are five very simple circuits, one for each catagory of contact to get you started. You shoud check the basic stamp applications for more circuts.
  1. >Simple Digital Input

    The intuitive part of this circuit is where the Stamp's pin either touches 5V or not depending on the position of the switch. The problem is that when the switch is open (not touching) the pin would be waiving in the breeze. We need to tie it down to a default position. We can take advantage of the fact that electricity always goes along the path of least resistance. While the switch is open, the current from the microcontroller's pin goes along the resistor towards the ground because it is the only game in town. The pin then feels LOW (0) (Ground). When the switch is closed the path towards +5V is unimpeeded by a resistor and so looks more appealling to the electrons. Now the pin feels HIGH (1) (5V).
    Also See
    Digital Input Catagory
    Digital Input Program
    Digital Input Transducers
    Table of Contents

  2. Simple Analog Input

    The easy (naive) way to look at this circuit is that the stamp sends out 5V and depending on how much resistance the variable resistor is providing, a certain percentage of that 5V comes back. (Actually the stamp is sending out some juice and then timing how long it takes the capacitor in the ciruit to discharge.) Depending on that percentage, the microcontroller gives you a number (0-225) that descibes the analog state of the variable resistor. All this happens really fast when you give your Stamp the POT command.


    Also See
    Analog Input Catagory
    Analog Input Program
    Analog Input Transducers
    Table of Contents

  3. Simple Digital Output

    With digital output you are usually turning things on and off. Which circuit you use will depend on the power requirements of the thing you are controlling. The simplest way is to turn on an off a LED which is small enough that the microcontroller itself can power it.


    You can use a transistor as a switch which is thrown when power is applied to its base. You only need to apply the microcontroller's 5 Volts and the transistor can switch far greater voltage. In this way the transistor is acting as an amplifier. THIS CIRCUIT WILL NOT WORK FOR AC POWER (LIKE THE POWER FROM A WALL SOCKET). You can only use this with DC circuits. You should also check the transistor's package to see that it meets your load's voltage and current requirements. A common mistake with this circuit is not comingling the ground of the stamp with the gound of your DC load. You need to combine these grounds for the circuit to work.


    Finally if you want to turn something on that uses electicity from a wall socket AC power, you have to add a relay to the circuit. This adds another level of amplification and isolation from the microcontroller. The transistor can switch the kind of power the relay needs and the relay can switch the kind of power your AC appliance needs. Check the package of the relay to see that it meets your AC load's voltage and current requirements. The LED and capacitor are only there to eat up the charge that the coil in the relay kicks back into the circuit when it turns off. There are 5V (TTL compatible) solid state relays that make all this easier. Please be very
    careful and fully test the circuit (you can hear the relays click) before you add the AC Power.


    Also See
    Digital Output Catagory
    Digital Output Program
    Digital Output Transducers
    Table of Contents

  4. Simple Analog Output

    Your microcontroller does not itself have enough power to drive anything but tiny electrical components like a LED or a Piezo transducer. To power real electrical appliances you would have to amplify the signal coming from the stamp. For now, just try using the Pulseout command with and LED or Piezo.


    Also See
    Analog Output Catagory
    Analog Output Program
    Analog Output Transducers
    Table of Contents

  5. Simple Serial Input and Output

    Put a 22k resistor between the transmit pin of the computer and the SERIN pin of the stamp. You can directly connect the the recieve pin of the computer to the SEROUT of the stamp. The resistor is to protect the stamp which operates at lower voltages than real RS232 devices. You may also attatch the "Ready to Send" (RTS) line of the MAC to the stamp. One thing about the stamp is that the SERIN Command totally freezes the stamp until some serial communication comes in. You can use the RTS line attached as an ordinary digital input to tell the stamp that it is safe to use the SERIN command because you are about to send something.

    The stamp operates at 5V which is lower than proper R232 communication. The MAC which really uses RS423 communication is also a lower voltage so everything works fine. There is a circuit that you can add to your stamp to make it real RS232. If you are communicating with something like a laserdisc player which has a choice between RS232 and TTL, use TTL.


    Also See
    Serial Communication Catagory
    Serial Communication Program
    Table of Contents

If you have suggestions or corrections please contact: osullvnd@acfcluster.nyu.edu